Thursday 26 November 2015

Using Bamboo for Deployments

As part of a project involving the complete redevelopment of a large UK based loyalty programme website, it was also necessary to assess the development processes that were being used and identify areas of improvement.

The status quo of the software lifecycle was that changes that were required on the server side were developed offshore and then the skeleton JSP files were provided to the onshore web team who would apply the styling (CSS) and front end validation (Javascript). These JSP files were managed and edited within the CMS which resulted in content editors having to know technologies such as HTML, CSS and JSP. Consequently, the web team were burdened with managing the content for the live website, usually at very short notice. Furthermore, the packaging of the server side, CMS and additional applications were bundled as one monolithic Java Enterprise Archive (EAR) distribution and deployed manually on application servers. Testing was also completely manual and although there were a number of test environments, each was configured slightly differently and not representative of the production environment. The entire deployment process was very labour intensive and consequently release into production (performed by a separate production support team) was a very exhausting and painful experience for those involved. Releases had to be scheduled every two weeks and performed in the early hours of the morning with a number of people on-call to provide support.

Instead of reusing any of the existing codebase, it was decided to start from the ground-up using the a new CMS as the platform to develop the new website that would serve multiple channels and also facilitate the marketing team to manage its content.

The business was also undergoing a transition from a traditional 'waterfall' method of development to using 'agile' processes. Behaviour Driven Development (BDD) was employed to capture and refine requirements.

There were also a number of technologies and tools adopted to deliver enhance productivity and deliver value. We decided to abandon the heavyweight enterprise application server as there was no need for the additional features that it provided, and use the more lightweight Tomcat servlet container. Jira [1] was used to capture requirements as stories, to raise issues and defects, and generally plan and track the project. Confluence [2] was adopted for documentation purposes and as a collaboration tool to discuss designs. Bamboo [3] was used as the continuous integration and build tool and all new source code was required to have unit tests. Functional and acceptance tests were developed using Cucumber [4] and Ruby [5] to create an automated regression testing suite.

Bamboo was configured to monitor every time code was committed to version control and trigger a build and test. With third-party plugins such as Sonar, the team was provided with visibility of test coverage and code quality. Using Bamboo to perform deployments into all environments also provided confidence in the deployment process so that there were no surprises during release into production. As the acceptance tests were also built and executed by Bamboo, it was possible to trigger them from Bamboo after a deployment using Bamboo's REST interface.

Bamboo deployment plans allow software artefacts created during the Bamboo build plans to be deployed into a given environment.

Bamboo Deployment Plans
The above screenshot shows how Bamboo can be used to deploy into different environments. Each environment needs to be configured with tasks that determine how the artefacts will be deployed.

Bamboo Deployment Tasks
The screenshot above shows the tasks used to deploy the website into the performance testing environment. The artefact is downloaded on to the Bamboo server and then a script is executed to perform variable substitution of environment specific configuration. The artefacts are then copied to the remote server using the SCP Task and finally Tomcat is stopped, the artefacts deployed and Tomcat restarted by executing a script on the remote server (SSH Task). These tasks are then repeated for the second server in the clustered environment. The tasks are replicated for each environment to ensure consistency in the deployment process but each environment also has some specific configuration such as the address of the database server and external web services. These can be specified as environment variables and then referenced from the deployment tasks such as $bamboo_catalina_base.

Bamboo Deployment Plan Variables
Using Bamboo for deployment made life so much easier for developers, testers and production support. Nevertheless, managing the Bamboo configuration was becoming cumbersome as with every change to the deployment process, the numerous deployment tasks and variables had to be updated for every environment. To streamline the deployment pipeline further, it was necessary to move the environment specific variables and tasks into property files and scripts that could be executed remotely. The deployment scripts were maintained in version control just like the website source code and packaged along with the application as a separate artefact by Bamboo. This had the benefit of decoupling the deployment process from Bamboo and reducing the number of tasks required to be configured in Bamboo for additional environments. So although Bamboo is still being used for deployments and executing the acceptance tests, it is much easier to manage and test changes to the deployment process.

Deployment Script
Environment Properties
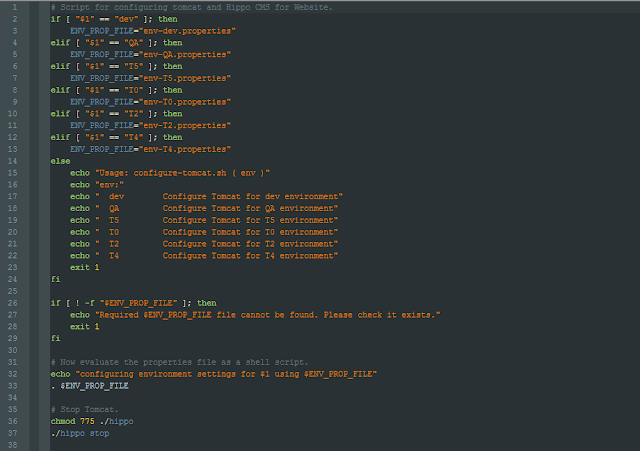
The above screenshots show the deployment script that is now executed by Bamboo along with a sample properties file. The properties file captures the environment specific variables that were previously managed within Bamboo. Line 33 of the script shows how the properties file is read into the script. Lines 62 to 67 shows how an array is declared and the app_cluster from the properties file is read into the array. The array is then iterated over to configure the node that matches the ip address of the server. This allows additional nodes to be added to the cluster very easily by simply updating the properties file. Lines 86-100 perform the variable substitution on a number of configuration files by using the variable values specified within the properties file. Lines 107-118 then copy these configuration files to the relevant directories and restart Tomcat.

Bamboo now simply needs to invoke this script as shown below.
Invoke Deployment Script
The post-deployment smoke tests are invoked from Bamboo through its REST API.

curl --user $bamboo_smoke_test_user:$bamboo_smoke_test_password -X POST http://galbamboo:8085/rest/api/latest/queue/CMS-SMK?bamboo.variable.CMS_ENV=qa

References:

[1] https://www.atlassian.com/software/jira/
[2] https://www.atlassian.com/software/confluence/
[3] https://www.atlassian.com/software/bamboo/
[4] https://cucumber.io/
[5] https://www.ruby-lang.org/en/
Wednesday 16 September 2015

Migrating from SVN to Git

Our project team had been using SVN for the last 8 months as its source control management tool. All development was done on trunk and releases were created from a release branch. After 8 months, when the project (new responsive website on new multi-channel CMS platform) went live, we continued developing on trunk and any hot-fixes were made on the release branch and then merged into trunk. Merges were intentionally kept small and frequent and we avoided feature branches altogether.

Strategically the business wanted to adopt a number of new tools including Slack (team messaging, collaboration), Asana (Project and Task management) and Git, so I was tasked with migrating our project from SVN to Git. The repository would be hosted on github and thereby minimise maintenance as there was no server to manage to ensure there was sufficient disk space, or upgrading the scm tool to a later version.

This post describes the process.

The atlassian tutorial [1] provides 5 simple steps to help migrate users from SVN to Git.

  1. Preparing the environment
  2. Converting the SVN repository to a local Git repository
  3. Synchronizing the local Git repository when the SVN repository changes
  4. Sharing the Git repository with developers.
  5. Migrating development effort from SVN to Git.

1. Preparing the Environment

After downloading and executing the migration script, it was found that the versions of Git and SVN that were available with the Linux distribution [2] were not of the required versions. It was therefore necessary to install the latest version of Git (2.5.2) from source [3].

Once again, after downloading the Git source, it was found that the necessary dependencies such as the gcc compiler and make tool were missing. These were installed using the yum Development Tools package.

The atlassian migration-script was still complaining about the SVN version so the latest version (1.8.14) was also installed by configuring an additional yum repository [4].

The final piece of the jigsaw was to install the correct subversion perl bindings for the updated SVN by executing yum install subversion-perl

Finally, the svn-migration-scripts verify command was able to successfully execute.

[root@devapp1 git-migration]# java -jar svn-migration-scripts.jar verify
svn-migration-scripts: using version 0.1.56bbc7f
Git: using version 2.5.2
Subversion: using version 1.8.14
git-svn: using version 2.5.2
[root@devapp1 git-migration]#

2. Converting the SVN repository to a local Git repository

The tutorial mentions running git svn clone --stdlayout --authors-file=authors.txt
 <svn-repo>/<project> <git-repo-name>

This fails with the following error if the SVN repository requires authentication.

Password for 'myuser': Can't locate Term/ReadKey.pm in @INC (@INC contains: /usr/lib/perl/site_perl/5.14
/usr/lib/perl5/site_perl/5.14/x86_64-cygwin-threads /usr/lib/perl5/vendor_perl
/5.14/x86_64-cygwin-threads /usr/lib/perl5/vendor_perl/5.14 /usr/lib/perl5/5.14/x86_64-cygwin-
threads /usr/lib/perl5/5.14 .) at /usr/lib/perl5/vendor_perl/5.14/Git.pm line 565.

Therefore it is necessary to first run the svn checkout command so that svn caches the credentials and then also install the Perl Term ReadKey package:
perl -MCPAN -e shell

After the shell initiation, install the ReadKey package:
install Term::ReadKey

It should now be possible to create a local Git repository from the SVN repository.

The cloning of the SVN repository creates the SVN branches and tags as remote branches. The clean-git script included in the svn-migration-scripts.jar kept on deleting the branches and tags that were being created so git branch only showed the master branch.

Executing "java -Dfile.encoding=utf-8 -jar ../svn-migration-scripts.jar clean-git --force --no-delete" allowed us to create the local git branches including all the obsolete and deleted ones.

Executing git branch now showed the local git branches, but git tag was still not returning any tags.

The following script was used to create the git tags changes the path to the tags.[5]

Create Git Tags

3. Synchronizing the local Git repository when SVN changes

The synchronizing of the local Git repository with SVN changes works as described in the documentation by simply fetching the latest changes, rebasing the Git repository and then doing a clean up.

git svn fetch

java -Dfile.encoding=utf-8 -jar ~/svn-migration-scripts.jar sync-rebase

java -Dfile.encoding=utf-8 -jar ~/svn-migration-scripts.jar clean-git --force

4. Sharing the Git repository

This step involves pushing the local Git repository to a public Git repository server and then allowing developers to pull and push commits to and from the public repository.

To facilitate pushing changes to a remote repository, Git uses a 'remote' reference as an alias for the remote repository URL. The remote reference can be anything one chooses but if the remote repository is going to serve as the official codebase for the project, it is conventionally referred to as 'origin',
git remote add origin https://\@bitbucket.org/\/\.git

Once the remote has been set up, the changes can be pushed to the remote repository.

git push -u origin --all
git push --tags

Instead of bitbucket, our project team used github to host our remote repository. The uploading of the git repository failed as there were some files with a history of being larger than 100MB in size which github doesn't allow. The file contained the binary data of images that were pruned once development matured (as the images were moved to be managed in the production environment and not within the codebase). However, to allow the uploading of the Git repository, it would be necessary to remove the history of the offending file. This is where the BFG utility came to the rescue [6].

To Be Continued....


References:

[1] https://www.atlassian.com/git/tutorials/migrating-overview
[2] Red Hat Enterprise Linux Server release 6.6 (Santiago)
[3] http://johnathanmarksmith.com/linux/git/programming/2013/05/15/how-to-install-git-182-on-fedora-centos-red-hat-and-scientific-linux/
[4] http://tecadmin.net/install-subversion-1-8-on-centos-rhel/
[5] http://blogs.atlassian.com/2012/01/moving-confluence-from-subversion-to-git/
[6] https://rtyley.github.io/bfg-repo-cleaner/

Thursday 21 May 2015

Hippo CMS with Spring Security

Hippo CMS already uses Spring for dependency injection as part of the HST framework used to develop websites. By default, it uses JAAS as its authentication mechanism and the CMS repository (via the HippoAuthenticationProvider) for authenticating login credentials and providing security roles for the authenticated user.

The existing website application already had in excess of 10 million users and there was no way that these users would be moved into the CMS repository. Fortunately Hippo can be configured with a custom AuthenticationProvider to use a database or LDAP service rather than the CMS repository for authenticating login credentials.

As part of the redevelopment of the website, the login UI was also redesigned. The default form based authentication uses the Hippo UI templates to render the login form. Again this was quite easy to replace with a custom login form template by following the online documentation [1].

At this point the development was looking good, the show and tell at the end of the first sprint demonstrated the new login story and the home page with integration to internal services for authentication and customer transactional data.

The next sprint required some changes to the login functionality based on insights gathered from user testing and UI/UX designers. Due to the business requirements, the login functionality was required to display a number of different messages depending on the cause of authentication failure. This may involve a simple error message, or asking the user that they need to activate their account or to contact the call centre if their account had been locked.

Using the default login mechanism proved to be difficult in propagating different error messages from the custom AuthenticationProvider back through the Hippo JAAS LoginModule and to the Hippo LoginServlet to render the login form. This was due to the Hippo LoginModule catching any exceptions from the AuthenticationProvider and throwing a new JAAS LoginException with a default error message thereby losing the error code and message from the original exception. There were also other issues with CSS when the login form was redisplayed after an authentication failure.

Furthermore, there was also a lurking requirement that the new mobile apps would be required to integrate with Hippo CMS for authentication and content. This would require developing a RESTful API to expose the content for the mobile apps to use. The mobile apps would not use http form based authentication for a RESTful API. Consequently the new website would need to provide a different authentication method depending on the access channel (web browser or mobile app).

The above issues and the complexity involved in customising the JAAS implementation were the main deciding factor to adopt Spring Security. Fortunately, we were not the first team that needed to do this and the Hippo community provides a project that details the integration of Spring Security with HST based website applications.[2]

The configuration is pretty simple and requires configuring the Spring Security filter within the web.xml file.

Spring Security Configuration in web.xml
This will now ensure all requests are passed through the Spring Security filter chain. The context files can be used to specify any security related Spring beans such as a custom authentication manager, authentication filters and success and failure handlers.

Thereafter, to integrate Spring Security within the HST based web application, it is simply a matter of adding the SpringSecurityValve into the HST request processing pipeline. As the HST pipeline employs the 'chain of responsibilty' pattern [3], by adding the SpringSecurityValve into the pipeline, HST will ensure the SpringSecurityValve has the opportunity to handle the request and establish a javax.security.auth.Subject if it finds a spring security Authentication instance.

The Hippo SpringSecurityValve allows securing the HST based website by configuring 'hst:sitemapitem' or 'hst:mount' nodes with security settings.

References
[1] http://www.onehippo.org/library/concepts/security/hst-2-authentication-and-authorization-support.html
[2] http://hst-springsec.forge.onehippo.org/
[3] http://en.wikipedia.org/wiki/Chain-of-responsibility_pattern

Thursday 23 October 2014

Hippo CMS Forms

As part of migrating a website application that has been continuously growing for the last 12 years over to a new CMS platform, it was necessary to understand how forms could be implemented using Hippo CMS.

After downloading the community edition of Hippo and working through the developer trail and reference documentation, there wasn't any clear example of how a form could be implemented. This post provides details of the proof-of-concept work carried out in developing a website form using registration as an example.

The existing website application provides a registration process that allows users to register with the site and also captures some additional information through a survey. The registration process is therefore spread over multiple pages.

Hippo CMS Forms
The above diagram shows how  the CMS repository is configured for the registration process. When a request for registration comes in, it will be matched to the register.html sitemap item. This is configured with the component hst:pages/register. This component reuses the hst:pages/standard component for the general page layout and provides the specific contents through its child body component. The body component shows how by specifying the SpringBridgeHstComponent as the componentclassname and the spring bean id (enrolmentComponent) as the parameter value for the spring-delegated-bean parameter name, we can define the component controller classes using Spring configuration and leverage its dependency injection functionality. The register/body node is also specifies a redirect-page parameter with 'survey' as its value. This parameter will be made available to the Spring configured enrolmentComponent to indicate which page the user should be redirected to after the form has been submitted.

Form Processing EnrolmentComponent
The above code extract shows the doAction method for the EnrolmentComponent. It shows how a list of the fieldnames is constructed and passed to the constructor of the Hippo FormMap object. At this point, the form would be used to construct an object that would be passed to the enrolment service via the Spring injected ServiceFacade. However, for the sake of simplicity and to serve as a PoC a previously generated identifier is used to retrieve existing enrolment details. The submitted form is then temporarily persisted in the repository for retrieval by the SurveyComponent and the configured redirect-page parameter is retrieved and used to redirect the response. By passing a StoreFormResult instance when persisting the form, we are able to retrieve the UUID to send back in the response. The UUID identifies the node where the form is stored in the repository.

The code below shows how the SurveyComponent then retrieves the form from the repository ready to be used as required.

SurveyComponent
As can be seen the UUID is extracted from the request and then used to populate a FormMap instance using the form data stored in the repository.

The above demonstrates how a website form can be developed using Hippo. It doesn't demonstrate error handling but its obvious how easily that can be implemented.

The above solution is very specific and doesn't allow for a generic form processing component that could be reused in different contexts. With this in mind the Hippo developer community provides the 'easyforms' plugin that makes it very easy to create forms using drag and drop widgets. This will be investigated in an upcoming post.

Hippo CMS

On a current project, my team are involved in the replacement of an old content management system (CMS) with one that can serve multiple channels and allow business users to update the website without intervention from developers. After reviewing a number of CMS products, we decided to settle on Hippo. It's open source, JCR-283 compliant, well designed with an intuitive UI and was better aligned with the technology stack in use.

To build a website with Hippo it is important to understand the underlying architecture and model. The Hippo developer trails and documentation provide a good reference and is used to present the summary below.

A Hippo CMS implementation is deployed as two Java web-applications. The Hippo CMS web application (cms.war) is the authoring tool used to create and edit content. The Hippo delivery tier-based (HST) site web application (site.war) is the end-user website.

Developing a website with the delivery tier (HST) is based on the Hierarchical MVC architectural pattern that allows a hierarchical structure of content and for content to be reused across multiple pages. The content stored in the repository and accessed using HST Content Beans represents the model. Java classes providing HST components encapsulate the controller and JSP or Freemarker templates are responsible for the view.

The configuration that connects the model, controllers and views is also stored in the repository under the /hst:hst node. The /hst:hst node stores all the configuration required for the website and processing of requests such as hosts, sites, channels and URLs.

Once a request has been matched to a host, site and channel it is further matched against the sitemap that contains a number of hst:sitemapitem nodes. We can think of the sitemapitem as representing the URL to a webpage. The sitemapitem references a HMVC root hst:component node typically under /hst:pages. This hst:component node can contain child hst:component nodes to provide the composite structure of a page. The hst:component node references a JSP or Freemark template (through its renderpath property) to provide the view and optionally references a  Java HST component class (through its componentclassname property) that implements the controller. If a component class is not provided, the component will use the default component class.

The diagram below will help understand how a page is typically configured in the Hippo repository.

Hippo CMS Page Composition

When a request that matches the sitemap item about.html it will be rendered as a textpage due to the hst:componentconfigurationid configured to reference hst:pages/textpage. The content that will be displayed in the rendered page is retrieved through the hst:relativecontentpath property. The hst:pages/textpage nodes models the structure of the webpage. The diagram above shows that the page reuses the hst:pages/standard page structure through the hst:referencecomponent property and references hst:component/content for its content child node.

The standard page is composed of an header and main child components and a template for rendering the view. The main component is further composed of a leftmenu and right child components and a template for rendering the view.

The child components that require some business logic such as header and leftmenu, again reference components under hst:components that specify the componentclassname that implements the logic and a template for the view. Similarly the content component also specifies its componentclassname that is responsible for retrieving its document from the repository and a template responsible for the view.

The configuration of templates is found under hst:templates where each template has a renderpath property that specifies the location of the JSP or Freemarker file.

This covers how the Hippo repository is typically configured to deliver modular web pages..

Wednesday 17 September 2014

Groovy Multimethods

One of the features of the Groovy language is multi-methods and how it differs from Java in the way it invokes methods. Java selects which methods to invoke based on the compile-time declared types of arguments. Groovy selects which methods to invoke based on the runtime types of the objects and arguments.

As an example, consider the following listing:


The x and y arguments are both of static (compile-time) type Object but x is of dynamic (runtime) type Integer and y is of dynamic type String. As a consequence, in Java both would dispatch to the same oracle(Object) method. However, in Groovy due to method dispatch being dynamic, the oracle(String) method is used when argument y is passed.

This has the benefit of avoiding duplicate code by being able to override more selective behaviour. Consider the following equals implementation that overrides Object's default equals method only for the argument type Point.

When an object of type Point is passed to the equals method, the specialized implementation is chosen. When an arbitrary object is passed, the default implementation of its superclass Object.equals is called. This gives the impression that equals(Point) is overriding equals(Object), which is impossible in Java. In Java, it would be necessary to check for null, check that argument is of the required Point type, cast the object to Point, and then perform the specific equals logic. This forces the developer to duplicate the logic of overriding equals for every custom type.


Tuesday 17 September 2013

Apache Web Server, Tomcat AJP: ajp_read_header: ajp_ilink_receive failed

Problem:

Apache Web Server configured to proxy requests to web application running on Tomcat (7.0.39) over AJP. The applications were installed on virtual machines in a cloud environment. On the completion of load tests (more than 24 hours), the system became unresponsive. Whenever a request was made to Apache an HTTP 503 status code was returned. Looking at the Tomcat logs showed no errors and requests could still be sent over the HTTP channel directly to Tomcat. CPU and memory consumption was also very low. Looking at the Apache log files showed errors of the following nature:


[error] ajp_read_header: ajp_ilink_receive failed
[error] (70007)The timeout specified has expired: proxy: read response failed from 10.1.3.3:8009 (10.1.3.3)


Tomcat could no longer handle any more requests from Apache over AJP and required a restart.

Analysis:

Doing a 'netstat' for port 8009 on the app server VM showed that there were 200 connections still in an ESTABLISHED state, with 100 connections in a CLOSE_WAIT state.
 From this initial analysis, a number of questions arose:

  • How did the number of AJP connections grow so large?
  • Why did the number of connections not close after a period of inactivity?
  • What was causing Tomcat from accepting any more requests?
Reading the AJP documentation confirmed that by default the AJP connection pool is configured with a size of 200 and an accept count (request queue when all connections are busy) of 100. To confirm the findings, Tomcat was configured with a smaller AJP connection pool (20) and as expected the errors in Apache occurred sooner and more frequently. 
To address the issue, Apache (MaxClients) and Tomcat (maxConnections) were both configured to support 25 concurrent requests. This worked perfectly (Apache no longer returned 503 responses and the log files no longer showed the ajp_link errors). The test was then repeated after increasing the connection pool to 50. Running a load test for an hour showed the servers working well, response times improved and no 503 responses. However, after the test completed, the Tomcat VM still showed 50 connections in an ESTABLISHED state. A further read of the Tomcat AJP documentation revealed that the connections remain open indefinitely until the client closes them. The next thing to try was the 'keepAliveTimeout' on the AJP connection pool. This had the effect of closing the connections after a period of inactivity and therefore seems to have resolved the issue. Ideally, the AJP connections should grow as load increases and then reduce back to an optimal number when load decreases. The 'keepAliveTimeout' has the effect of closing all connections that are inactive.

Solution:

Configure Apache 'MaxClients' to be equal to the Tomcat AJP 'maxConnections' configuration.
Configure Tomcat AJP 'keepAliveTimeout' to close connections after a period of inactivity.

References:
Tomcat AJP: http://tomcat.apache.org/tomcat-7.0-doc/config/ajp.html
Apache MPM Worker: http://httpd.apache.org/docs/2.2/mod/worker.html